Azure Functions on Typescript
I’ve been playing around with Azure Functions for quite some time now. However I’ve been trying it with the corresponding Visual Studio Code extension. After all it’s a pretty smooth start, all things are published by Microsoft itself and well documented.
Soon I noticed that access to the filesystem seems to be slow on Azure’s
serverless runtime. This is if your code relies on larger amounts of files to be loaded
from node_modules, then you’ll face long cold start times. However there’s a simple
solution to that: Webpack. And I wanted to go with Typescript anyhow, so let’s
use ts-loader as well. How hard can it be.
Since there was no template project for it, I’ve just created a new project template azure-nodejs-typescript over on GitHub. It’s mainly a mashup of aws-nodejs-typescript template and the azure-nodejs one.
To create a new serverless service project based on it, simply run the following (after possibly installing serverless framework globally before):
$ sls create --template-url https://github.com/stesie/azure-nodejs-typescript --name my-new-service
$ cd my-new-service
$ yarn install
It’s just the minimal outline to get you started: a simple hello function with HTTP bindings.
import { IContext, HttpRequest } from 'azure-functions-typedefinitions';

export function hello (context: IContext, req: HttpRequest): void {
  context.log.info('Hello from a typed function!');

  const resBody = {
    invocationId: context.invocationId,
    name: context.executionContext.functionName,
    startTimeUtc: context.bindingData.sys.utcNow
  };

  context.res.json(resBody);
}
… as you can see it already comes with a dependency on azure-functions-typedefinitions
and declares types on both handler arguments. This allows for convenient auto-completion
(and type-checking) within context, i.e. context.res.json.
PS: I haven’t noticed those before, but there are helper methods on the context.res object,
to fluently construct the response.
See the definition of Response class for details.
AD-based auth on Azure w/ serverless framework
So I recently gave the marvellous serverless framework another try, this time with Azure Functions. On our company account … which uses AD-based login. Yet serverless framework wants (and only supports to) interactively create a service principal account and grant access rights to that one. Per se this is a good idea, yet my AD-user of course may not grant these rights.
If you try to do it anyway, you’ll get an error message like this:
  Error --------------------------------------------------

  The client 'stefan.siegl@mayflower.de' with object id '00000000-0000-0000-0000-000000000000' does not have authorization to perform action 'Microsoft.Authorization/roleAssignments/write' over scope '/subscriptions/00000000-0000-0000-0000-000000000000'.
To me it doesn’t feel like a viable option to ask the AD-admin to grant those rights to each
employee’s service principal account (manually later on). So I wanted to try whether it’s
feasible to just recycle azure-cli’s access tokens (which resides under ~/.azure/accessTokens.json).
And off I went, … here’s the Gist with the resulting .patch file.
After installing serverless-azure-functions node module, just apply the patch like this:
curl https://gist.githubusercontent.com/stesie/5ae160647d6ff29a69a4ad7372d706f7/raw/ebcf67f6c207e2f21be5a0f870de5660c7955e69/serverless-azure-functions-auth.patch | \
  patch -p1
… of course this is quite a hack. For the moment it works. If you feel like this should be done differently, or go upstream somehow, feel free to ping me. Either by e-mail or over on Twitter.
Custom Keyboard Layout on NixOS, revisited
Roughly two years ago I already wrote an article
on how I configured my customized keyboard layout on NixOS. Unfortunately this broke
some months ago and so far I never really had the time to track down what’s going wrong.
Instead I had a little xmodmap file around, that tweaks the layout after applying the
base layout with setxkbmap us dvp.
Of course this was annoying, after each and every home-manager switch or
nixos-rebuild switch I had to re-apply the changed layout. Also after (re-)attaching
the USB keyboard, etc.
So I finally sat down, … at first trying to just override xorg.xkeyboardconfig. Turns
out that still is a bad idea, at least if you don’t want to compile large parts of your
system locally. So there must be a better way, and just touching setxkbmap and xkbcomp
still feels right. Yet the xserver itself keeps complaining the layout doesn’t exist, even
though setxkbmap accepts it. (and also nixos-rebuild itself now complains)
Turns out the xorgserver package now provides two extra options
--with-xkb-bin-directory and --with-xkb-path, … and that setting both of them is
necessary. If you just set --with-xkb-path then X.org accepts the layout, yet xkbcomp
fails since it fetches the correct rules (from the overridden package), yet the wrong symbols
file. So just override both :)
And to keep nixos-rebuild happy also override xkbvalidate utility, or specifically:
the libxkbcommon dependency of it, so it also has access to the modified rules & symbols.
So my /etc/nixos/configuration.nix now looks like this:
  services.xserver = {
    enable = true;
    layout = "us";
    xkbVariant = "stesie";
    xkbOptions = "lv3:ralt_switch";
  };

  nixpkgs.config = {
    packageOverrides = super: rec {

      xorg = super.xorg // rec {
        xkeyboardconfig_rolf = super.xorg.xkeyboardconfig.overrideAttrs (old: {
          patches = [
            (builtins.toFile "stesie-dvp.patch" ''
                          Index: xkeyboard-config-2.17/symbols/us
                          ===================================================================
                          --- xkeyboard-config-2.17.orig/symbols/us
                          +++ xkeyboard-config-2.17/symbols/us
                          @@ -1557,6 +1557,34 @@ xkb_symbols "crd" {
                             include "compose(rctrl)"
                           };

                          +partial alphanumeric_keys
                          +xkb_symbols "stesie" {
                          +
                          +    include "us(dvp)"
                          +    name[Group1] = "English (Modified Programmer Dvorak)";
                          +
                          +    //             Unmodified       Shift           AltGr            Shift+AltGr
                          +    // symbols row, left side
                          +    key <AE01> { [ ampersand,       1                                           ] };
                          +    key <AE02> { [ bracketleft,     2,              currency                    ], type[Group1] = "FOUR_LEVEL_ALPHABETIC" };
                          +    key <AE03> { [ braceleft,       3,              cent                        ], type[Group1] = "FOUR_LEVEL_ALPHABETIC" };
                          +    key <AE04> { [ braceright,      4,              yen                         ], type[Group1] = "FOUR_LEVEL_ALPHABETIC" };
                          +    key <AE05> { [ parenleft,       5,              EuroSign                    ], type[Group1] = "FOUR_LEVEL_ALPHABETIC" };
                          +    key <AE06> { [ equal,           6,              sterling                    ], type[Group1] = "FOUR_LEVEL_ALPHABETIC" };
                          +
                          +    // symbols row, right side
                          +    key <AE07> { [ asterisk,        7                                           ], type[Group1] = "FOUR_LEVEL_ALPHABETIC" };
                          +    key <AE08> { [ parenright,      8,              onehalf                     ], type[Group1] = "FOUR_LEVEL_ALPHABETIC" };
                          +    key <AE09> { [ plus,            9                                           ], type[Group1] = "FOUR_LEVEL_ALPHABETIC" };
                          +    key <AE10> { [ bracketright,    0                                           ], type[Group1] = "FOUR_LEVEL_ALPHABETIC" };
                          +    key <AE11> { [ exclam,          percent,        exclamdown                  ], type[Group1] = "FOUR_LEVEL_ALPHABETIC" };
                          +    key <AE12> { [ numbersign,      grave,          dead_grave                  ] };
                          +
                          +    // home row, left side
                          +    key <AC01> { [ a,               A,              adiaeresis,      Adiaeresis ] };
                          +    key <AC02> { [ o,               O,              odiaeresis,      Odiaeresis ] };
                          +    key <AC04> { [ u,               U,              udiaeresis,      Udiaeresis ] };
                          +};

                           partial alphanumeric_keys
                                  xkb_symbols "sun_type6" {
                          Index: xkeyboard-config-2.17/rules/evdev.xml.in
                          ===================================================================
                          --- xkeyboard-config-2.17.orig/rules/evdev.xml.in
                          +++ xkeyboard-config-2.17/rules/evdev.xml.in
                          @@ -1401,6 +1401,12 @@
                                   </variant>
                                   <variant>
                                     <configItem>
                          +            <name>stesie</name>
                          +            <description>English (Modified Programmer Dvorak)</description>
                          +          </configItem>
                          +        </variant>
                          +        <variant>
                          +          <configItem>
                                       <name>rus</name>
                                       <!-- Keyboard indicator for Russian layouts -->
                                       <_shortDescription>ru</_shortDescription>
            '')
          ];
        });     # xorg.xkeyboardconfig_rolf

        xorgserver = super.xorg.xorgserver.overrideAttrs (old: {
          configureFlags = old.configureFlags ++ [
            "--with-xkb-bin-directory=${xkbcomp}/bin"
            "--with-xkb-path=${xkeyboardconfig_rolf}/share/X11/xkb"
          ];
        });

        setxkbmap = super.xorg.setxkbmap.overrideAttrs (old: {
          postInstall =
            ''
              mkdir -p $out/share
              ln -sfn ${xkeyboardconfig_rolf}/etc/X11 $out/share/X11
            '';
        });

        xkbcomp = super.xorg.xkbcomp.overrideAttrs (old: {
          configureFlags = "--with-xkb-config-root=${xkeyboardconfig_rolf}/share/X11/xkb";
        });

      };        # xorg

      xkbvalidate = super.xkbvalidate.override {
        libxkbcommon = super.libxkbcommon.override {
          xkeyboard_config = xorg.xkeyboardconfig_rolf;
        };
      };
    };
  };
Automating my Todoist with Huginn & Alexa
As mentioned here before I’m heavily relying on Todoist to stay organized. And I have a pretty detailed set of recurring tasks reminding me of things like taking dietary supplements or watering the flowers.
However it’s troublesome to take out the cell phone, unlock it and tick off the item on Todoist after e.g. watering the flowers. As I’m currently experimenting with having Amazon Echos in my flat I wondered if it’d be feasible to ask Alexa to close the Todoist item. Turns out it is pretty simple to do, aside from one caveat: every custom skill has a so-called invocation name and it must be part of the invocation utterance.
So I decided to invoke like this:
Alexa, tell James that I just watered the flowers.
So first of all you need an own custom skill, in this case named James – which is never going to be published, just used in developer mode. Then you need to provide at least one intent, e.g. FlowersWateredIntent, along with some sample utterances (in this case things like that I just watered the flowers). All this can be done in Amazon’s Developer Services Portal.
Then Huginn has to be configured, we need three agents (actually 1 + 2n where n is the number of intents to handle):
- one WebhookAgent that simply provides an endpoint for the Alexa skill to call, set payload_path to a single dot
- one TriggerAgent per intent that shall be handled, matching on the name
of the intent. The rules array should look like this:
"rules": [ { "type": "field==value", "value": "FlowersWateredIntent", "path": "name" } ] - an agent to perform the requested task, in my case a TodoistCloseItemAgent with id set to the item id of the item I’d like to be closed upon invocation
Last but not least we need some glue between Alexa Skills Kit and Huginn. The easiest approach is a AWS Lambda function like this, which after all is a straight forward, minimalist Alexa skill handler simply passing all incoming request forward:
/* eslint-disable  func-names */
/* eslint quote-props: ["error", "consistent"]*/

'use strict';
const Alexa = require('alexa-sdk');

// Replace with your app ID (OPTIONAL).  You can find this value at the top
// of your skill's page on http://developer.amazon.com.
const APP_ID = 'amzn1.ask.skill.3dbd7451-5830-4b20-a2d6-d1ab0387119e';

const HELLO_MESSAGE = 'Hey, schön, dass du da bist. Das nächste mal sag einfach gleich was du von mir willst.';
const OK_MESSAGE = 'Okay';
const FAIL_MESSAGE = 'Irgendwie hat das nicht geklappt, Sorry!';
const HELP_MESSAGE = 'Hilf dir selbst, nur dann hilft dir England!';
const STOP_MESSAGE = 'Bye bye cruel world!';

const https = require('https');
const post_options = {
    host: 'hostname.of.your.huginn.tld',
    port: 443,
    path: '/users/2/web_requests/67/allofthebeautifulandreallyloooooooooooongrandomtokengoeshere',
    method: 'POST',
    headers: {
        'Content-Type': 'application/json'
    }
};


const handlers = {
    'LaunchRequest': function () {
        this.response.speak(HELLO_MESSAGE);
        this.emit(':responseReady');
    },
    'Unhandled': function () {
        console.log(this.event);
        const data = JSON.stringify(this.event.request.intent);

        post_options.headers['Content-Length'] = data.length;

        const post_request = https.request(post_options, (res) => {
            if (res.statusCode == 201) {
                this.response.speak(OK_MESSAGE);
            } else {
                console.log(res);
                this.response.speak(FAIL_MESSAGE);
            }

            this.emit(':responseReady');
        });

        post_request.write(data);
        post_request.end();
    },
    'AMAZON.HelpIntent': function () {
        this.response.speak(HELP_MESSAGE);
        this.emit(':responseReady');
    },
    'AMAZON.CancelIntent': function () {
        this.response.speak(STOP_MESSAGE);
        this.emit(':responseReady');
    },
    'AMAZON.StopIntent': function () {
        this.response.speak(STOP_MESSAGE);
        this.emit(':responseReady');
    },
};

exports.handler = function (event, context, callback) {
    const alexa = Alexa.handler(event, context, callback);
    alexa.APP_ID = APP_ID;
    alexa.registerHandlers(handlers);
    alexa.execute();
};
So if I now speak to Alexa the Alexa Skills Kit backend does the voice recognition and triggers the lambda function. This lambda function calls out to Huginn’s PostAgent endpoint which emits an event (that includes all of the data ASK forwarded, so you even can handle slots there). The TriggerAgent matches on this event and triggers the task to actually be done.
Using KeePassHttp plugin on NixOS
I’m a long time user of KeePass 2 password manager, even so it is actually a Windows .NET application, that runs on Mono. It has two feature that are important to me, that the KeePass for Linux lacks:
- synchronize the underlying file on save (I share the .kdbx file using ownCloud), instead of just overwriting it (eliminating changes to the database from other hosts)
- reference credentials from other entries
… and as I’m back on NixOS, I of course wanted to have KeePass with the
KeePassHttp for Chromium integration. On Ubuntu installation is trivial,
KeePass itself is packaged, you take the plugin’s .plgx file and put it (as
root) next to the KeePass.exe file somewhere under /usr/share.
Oh well, /nix/store is read-only, hence different approach needed.
Turns out that keepass2 NixOS package already has a plugin field, which
just is set to an empty list. Therefore once you got the syntax it’s pretty
straight forward…
That’s what my /etc/nixos/configuration.nix file looks like (relevant parts):
{ config, pkgs, ... }:

let

  keepassWithPlugins = pkgs.keepass.override {
    plugins = [
      pkgs.keepass-keepasshttp
    ];
  };

in

{
  # ... primary part of configuration.nix goes here ...

  # List packages installed in system profile. To search by name, run:
  # $ nix-env -qaP | grep wget
  environment.systemPackages = with pkgs; [

    # ... other packages ...
    keepassWithPlugins
  ];
}
Huginn loves Todoist, pt. 2
As written about here before I’m heavily relying on Todoist to stay organized, and one part of the story (so far) have been three recurring tasks on my todo list:
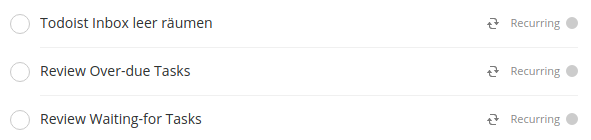
… they are just there to nag me every morning to consider what’s in my Inbox
(sitting there waiting to be assigned to projects and otherwise classified), what’s
over-due (to re-schedule or postpone) or labelled @waiting_for (I assign that
label to all tasks that wait for someone else; and I skim over them reconsidering whether
they got actionable meanwhile or need me poking). It’s just a routine, I
briefly go over them and tick them off.
Yet sometimes the Inbox is empty or there just are no items labelled @waiting_for.
It’s not much of a deal but I felt like having to automate that – i.e. just create
those tasks if there are items in the inbox, overdue or waiting for …
Well, as I already have Huginn connected to my Todoist it was pretty clear that
Huginn should also do that. So I had a look at the ruby-todoist-api Gem
I’m already using for the TodoistAgent
I wrote a month ago … turns out it has a query API, yet it isn’t as flexible as
the filter expressions
supported by Todoist’s web frontend.
It indeed allows you to do simple queries like today or tomorrow or over due.
But it doesn’t allow to search for projects, neither does it allow to combine queries
with boolean operators (like (today | overdue) & #work).
Yet another topic that escalated quickly, … I kicked off a new project
Todoist Querynaut, a Ruby gem, that
has a Treetop-based parser for Todoist’s query language, uses the somewhat limitted
API mentioned above and does the rest on the client-side. So if you query
(today | overdue) it actually does two calls to the REST API and combines the items
returned from both queries (filtering out duplicates).
So far Querynaut is still in its’ early days, yet already usable. It doesn’t yet
support some fancy kinds of queries (filtering by due date, to mention one), but
the outline is there.
The next part then was to extend Huginn by another agent, which I named TodoistQueryAgent.
It takes a query, executes it (via querynaut) and either emits an event for each
and every task found (for mode=item) or just emits the number of search results
(for mode=count).
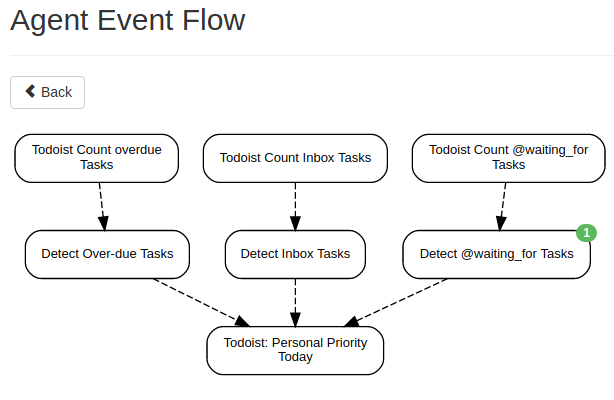
For the use-case from above I created three new agents scheduled for 8am every day,
went on setting mode to count and using p:Inbox, over due and @waiting_for
as query strings. Then I connected those three agents to three more Trigger Agents
that just compare the number of found tasks to be larger than zero and emit a suitable
message that ends up on Todoist – those of course are connected to a Todoist Agent
that properly forwards then. Like so:
In case you’d like to import this scenario, here’s my Huginn’s scenario JSON export. For that to work you need to have TodoistAgent 0.5.0 or newer installed.
Automating my Todoist with Huginn
So for some time now I’m using Todoist as my personal means of organization and (at least try to) practise GTD. It really helps me to stay organised (mostly) and keep focus, and even so non-free I’m using Todoist as it has both a nice and user-friendly Web UI as well as an Android App (both working well offline).
And then there’s Huginn which is a self-hosted IFTTT on steroids, which I’m also using for quite a while now. Yet so far I didn’t connect both tools.
Then there was that idea:
I tend to just “like” stuff over on Twitter to flag it for me to eventually “Read Somewhen”. Yet I use Todoist to keep a GTD-style somewhen maybe list.
So wouldn’t it be cool if tweets I liked would automatically pop up on my Todoist Inbox (at least if they are likely “stuff to read”)?
well, so I quickly noticed that Huginn doesn’t have a Todoist Agent and I’m not at all proficient in Ruby … anyways I gave it a try … so now there is huginn_todoist_agent :-)
In order to “click together” the Twitter-to-Todoist forwarder I created a scenario using three agents:
- Twitter Favorites Agent to continuously retrieve my Twitter favs and create an event for each and everyone
- a Trigger Agent consuming these events and filtering out stuff that’s not likely “to be read”
- last but not least the my own Todoist Agent configured with a “Huginn” label so I know where the tasks come from
The Trigger Agent is configured like this
{
  "expected_receive_period_in_days": "5",
  "keep_event": "false",
  "rules": [
    {
      "type": "regex",
      "value": "^http",
      "path": "entities.urls[0].url"
    },
    {
      "type": "!regex",
      "value": "^https://twitter.com/attn/status/",
      "path": "entities.urls[0].expanded_url"
    }
  ],
  "message": "Potential someday read: "
}
… it simply excludes all Tweets that either have no URL at all (so nothing to read there) or Tweets just mentioning other Tweets.
Using my “custom” Todoist Agent with Huginn’s docker container
is pretty simple: you just provide an environment variable
ADDITIONAL_GEMS with value huginn_todoist_agent and it auto-installs
it during first start of the container :-)
solving social problems with technology
So I’m living together with my girlfriend for quite a while now, but there’s that one thing why we regularly get mad at each other: I’m sitting at my desk in the living room coding and she keeps talking to me every now and then, interupting my thoughts over and over … and me slowly getting more and more annoyed … and then she complains why I once more didn’t tell here that I’m trying to concentrate and if I just had told her …
As I’m practicing pomodoro technique
(primarily to regularly take breaks and not sitting at my desk for hours
straight) I already have the information. Starting to work I hit S-p hotkey and
the pomodoro clock ticks down from 25 minutes to zero.
Wouldn’t it be great if only that information was available to my girlfriend? So I took one meter of WS2812 LED strip at 30 LEDs per meter, attached it to a bar made of cardboard and soldered a D1 mini to it …
problem solved, here’s what it looks like:

At the beginning it shows 25 red LEDs followed by five green ones; clearly showing that I would not want to be interrupted. As the minutes go by the red LEDs turn off, one every minute. And if only green’s left, then there’s that perfect moment to start chatting :)
The software part of the D1 mini is pretty simple, it just connects to my local MQTT broker and fetches time via NTP; … and the shell script which is triggered by the aforementioned keyboard shortcut now just also publishes the start timestamp of current pomodoro to the lightbar control topic.
… and being at it I kept improving the software, adding various modes of ambient and attraction light modes :)
PS: and as I’m now already publishing the pomodoro information to MQTT the next step is to automatically switch my cell phone & tablet into DND mode during the work-phase of every pomodoro. Unfortunately turns out that that isn’t as easy going as expected as there’s no Tasker plugin that’s able to subscribe to a MQTT topic. Just some discussion on Reddit.